In this beginner MagicaVoxel tutorial you will learn how to create voxel art for your games and projects using the MagicaVoxel editor! We will cover everything from creating a voxel model to sharing it with the world!

Are you ready to create your own voxel art? Whether you want to make something to share on your Instagram account or maybe you need a hero for your video game, this MagicaVoxel tutorial will help get you creating voxel art fast with MagicaVoxel.
Getting Started
Voxel art is a fast and easy way to create 3D models for your games or for creative works like in the pictures you see on Mega Voxels! This is one of the reasons so many people love using voxels. Now there are many tools available for building voxel art, but in this tutorial we will be using the most popular voxel editor available on the web. MagicaVoxel is the clear favorite for making voxel art because of its many features but most importantly, its Free!
This tutorial uses MagicaVoxel 0.99.6 or newer. If you need help installing MagicaVoxel, view our previous tutorial How to Install MagicaVoxel. There you can find a step by step tutorial on getting MagicaVoxel running on your computer.
Simple Walkthrough of MagicaVoxel
Once you have MagicaVoxel installed, go ahead and open up the application.

Now at first the UI will look a little intimidating. As I mentioned before MagicaVoxel has dozens of different features and tools for making voxel art look great. We’ll take it slow however and by the time we’re done you’ll feel right at home.
So to start off lets break down what all of theses windows are for in the picture above. From left to right:
- Color Palette: The window to the left is your color palette. In this window you can choose from a wide variety of colors. What makes it even nicer is the ability to add your own custom colors at the bottom.
- Brush: The second window from the left is the Brush window. This is where you can choose your brush mode. Some of the modes you can pick include Voxel (V), Face (F), Box (B), Line (L), Center (C) and Pattern (P). In addition to that, you can also pick an action for the brush such as Attach, Erase, Paint and Move.
- View: This window is located below the Brush window. Here you can quickly toggle the current display options such as Display Ground (DG), Display Shadow (SW), Display Background (BG), Display Grid (Grid), Display Edge (Edge) and Display Frame (Frame).
- Editor: The window right in the middle is where you will build all your voxel creations! You can move around in this are using your mouse.
Rotate by holding the right-mouse button down while dragging, zoom by rolling the mouse wheel up or down, and perform the selected Action by clicking the left-mouse button on the scene. - Edit: The second to last window from the right contains various operations that you can apply to your current voxel model. Zero empties the model, Fill fills the model with same color, Full sets the model to full volume. There are also operations to Rotate, Flip and Loop your model around an axis.
- Project: The last window is where you can Load, Save, Save As, Duplicate and even Delete voxel models.
- Export: You’ll find this section right at the bottom of the last window. These are the different export options supported by MagicaVoxel.
How to Create a Voxel Model
Now that you have a basic understanding of the MagicaVoxel software, we will show you how to create your very first voxel model! In this tutorial we will create a dog friend for the Mega Voxels bird.
Creating a New Voxel Model
Let’s start by creating a new file so that you have a blank canvas. Select Newunder File Options to create a new model. After that set the voxel model dimensions to 10,10,10, located at the top right of the main editor window.

Then click Clear under the Edit section to clear out the entire model.

Now name your file “VoxelDog” at the top of the Main Editor window.

Press Enter when you’re done. When the save dialogue comes up, choose where you would like to store your .vox file and then click Save when done.
Creating the Base
We will begin by creating the base of VoxelDog’s body. Now throughout the process I will be giving you different positions to place your mouse. However one of the fun things about voxel art is being creative! If you want to change it feel free to do so!
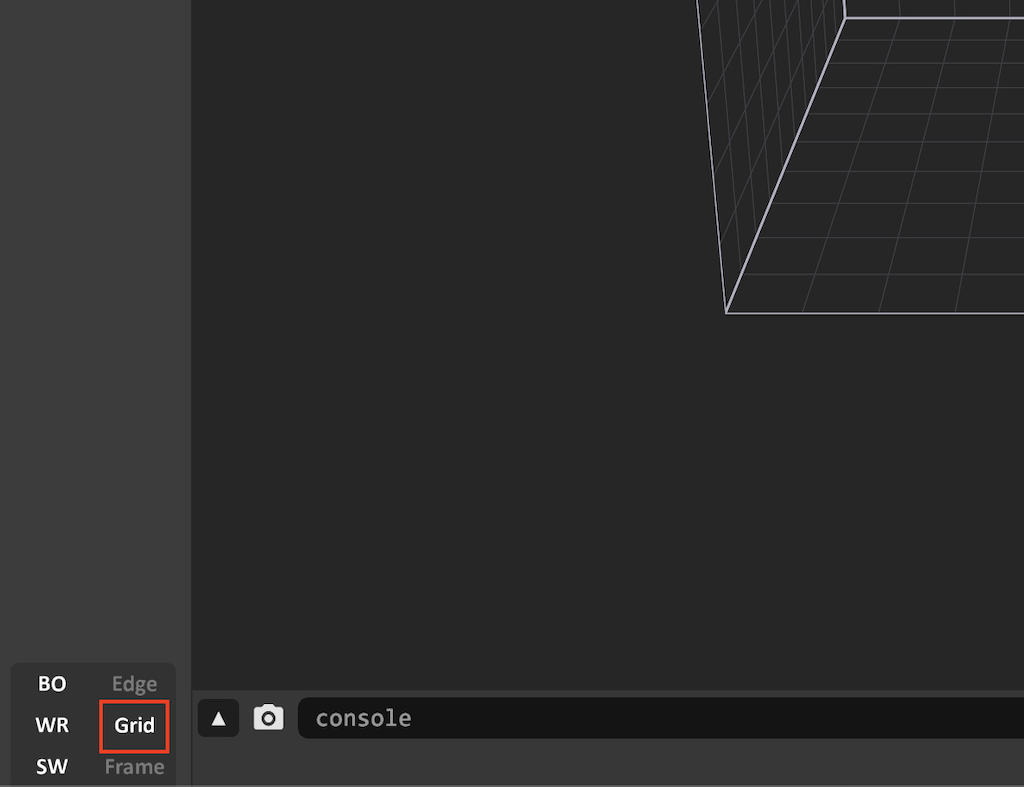
First to help us judge the number of voxels we are creating lets first turn on the Grid which is toward the bottom left of the main editor window.

Now let’s start by selecting a nice light brown color from the color palette on the left.

Next we will choose the correct brush. Press B to go into Box Mode, then press Tto select Attach. Or you can click the the button with the cube icon for Box Modeand then the Attach button inside the Brush window.

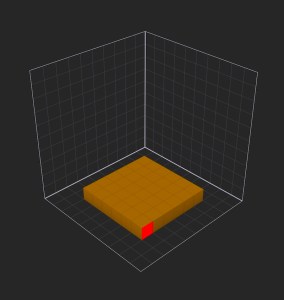
Move your mouse cursor to the position (x: 2, y: 7, z: -1). Left-click and hold the mouse button while dragging to position (x: 6, y: 6, z: -1). Release once you’re there to create a one voxel-high base. If you need help finding the position you are at it is located directly underneath the main editor window in the console window. Use the image below as a guide:


Extruding the Base
Change the brush by pressing F to go into Face Mode. Also make sure Attach is still selected. Left-click the top face of the base layer to extrude it one voxel upwards by dragging up. Keep holding and moving up until the base box is 6 voxels high:


Creating the Head
Let’s create the head section of the dog! Change the brush back to Box Mode by pressing B, again making sure that Attach is selected.
Start off at position (x:3, y:6, z:4). Left-click and drag to (x:4, y:4, z:1):


This is starting to look good but the dog’s head needs to be a little taller so we can add eyes and a nose later. Lets repeat the process we did earlier when we extruded the dog’s body. Select F to go back into Face Mode, also make sure Attach is still selected. Then start at position (x:3, y:6, z:5). Left-click and drag up until you reach the top of the workspace.


Creating the Nose
Now we have the basic structure for our dog we can make the nose. Press V to go into Voxel mode and make sure Attach is selected. This will allow you to add individual voxels wherever the red box appears and you click. Try it for yourself. Use the image below as a guide:

Paint the Eyes and Nose
Now its time to give our dog character a little more detail. Press V to go into Voxel mode. But this time instead of using Attach we are going to change it to Paint. Now click white from the color palette. Go ahead and paint two voxels white and then two voxels black for eyes. Then select a dark brown for the nose from the color palette. This will also be two voxels at the tip of the snout. Use the image below as a guide:

Adding Some Ears
So to add ears first let’s make sure that you have the same dark brown color that we used from the nose before. To help us out let’s use the mirroring feature in MagicaVoxel. Press the button toward the bottom that has the letter X. It should be next to an icon with 2 arrows facing each other. When you select X it will turn yellow.

Whatever you do now on one side will automatically mirror to the other side. Now select V again to go into Voxel Mode. Start building one ear, voxel by voxel, and you’ll see the other ear built at the same time. Reference these images to get a sense of where to start and where to end:

Adding Legs
So at the moment our dog doesn’t have any legs. So for legs lets select the light brown we used for the body. Make sure you still have the Mirror X option selected as this will save you a lot of work. Press V and begin adding voxels to create the back leg like in the image below:

Now to get the front legs we are actually going to carve them out of the main body. Press V and instead of using Attach we are going to change it to Erase. This will allow us to remove voxels from the main body. As before wherever the red square is that is the voxel that will be deleted. Try to replicate the image below:

Now all we need is paws in the front. Change Erase to Attach and add two voxels for the paws.

Fine Tuning
Now that the majority of the voxel dog is complete lets add the finishing touches! If you notice the paws are the same color as the body. Lets make them stand out by painting them the same dark brown on the ears!
To do that, go into Paint Mode by pressing G. Select the same dark brown used on the ears. Now paint the tips of the paws like the image below:

Congratulations! You just completed your first voxel model! To make it even better you learned a large chunk of MagicaVoxel that can be used to make other voxel creations!
Share your Voxel Model
Now that you’ve created some awesome voxel art, you’re probably eager to use it for a game or maybe get featured on Mega Voxels! Depending on what you want to do there are different options to choose from. In this tutorial well show you how to turn into an image so you can get some likes on Social Media!
Exporting a Voxel Model as an Image for Sharing to Social Media
In order to share your new voxel character to a social network like Instagram or Facebook, it must be exported from MagicaVoxel to a format that they accept. Fortunately MagicaVoxel supports the .png option which is the most widely supported image format.
To export any voxel model from MagicaVoxel as a PNG image, simply click the camera button under the editor window in the bottom left:

After you hit that button a Save dialogue will appear. Simply enter in a name and specify a location to save your new image to. Click save. For more posts on how to use MagicaVoxel check out our other great MagicaVoxel Tutorials.
Success!

That’s it! Now you can share your own creation with the world! If you want to share your creation with us for a chance to get a shout out on our page, tag us on Instagram or Facebook using @megavoxels or use the hashtag #megavoxels! We are always checking for new voxel artists everyday! If this post was helpful please considering sharing it! Have fun!