Mega Voxels makes it easy to increase the grid for your voxel model, so you can have a larger grid to work with. In this tutorial, we will show you how to resize a grid for your voxel model so that you can add more detail.

As you start to do alot of voxel art, you might have come across a situation where you need to enlarge the grid so that you can add more details to your voxel model. You might have completed the beginner tutorial for Mega Voxels and now your asking, how do I resize the grid in Mega Voxels? The good news is that Mega Voxels allows you to resize your grid directly in the app fast and easy so that you can add more customizations to your model. Well cover the steps on how to resize your model.
This tutorial supports Mega Voxels 1.1 or newer. If you need help installing Mega Voxels, view our previous tutorial How to Install Mega Voxels. There you can find a step by step tutorial on getting Mega Voxels running on your device.
What is a Grid?
In order to increase the size of the grid, it’s a good idea to know what a grid is. A grid, when working with voxels, is a container where voxels are placed. A grid has a width (x axis), a height (y axis) and a depth (z axis). For organizational reasons, voxels are not allowed outside of a grid. A single grid represents a single voxel model. Most of the times the default grid size that come with Mega Voxels is ok, but occasionally you might need to increase or reduce the size of the grid to match the type of objects you are trying to create. This tutorial will show you how to do this.
Getting Started
First let’s open up Mega Voxels. For this example we will use the “dog” model that you create in the tutorial for Mega Voxels. However feel free to use your own voxel model or one from the shop if you don’t have one.

Now that we have a model opened we must go from World Mode into Model Mode. This allows us to select a single model in our scene and edit the contents of that model. One of the properties specifically is the grid size.
To do this simply tap on the model and a context menu will appear above the model. Tap on the Edit button on the left side to enter into Model Mode for the selected model.

We will now cover how to change the size of the grid so we can add more voxels to our model.
How to Resize the Grid
So next we will cover how to increase the size of the grid. Remember that a grid is identical to a container. You can actually see the bounds of a grid by locating the outline around your model like the one below. To resize this grid, this simply tap on the Resize button at the top right of the screen.

When you tap the button a new menu will appear that says Resize. The first button at the top right of the window says Optimize. This button will automatically remove any empty space inside of your grid to match the shape of the voxels inside of the grid.
For this tutorial we don’t want to remove the space, we actually want to increase the space. That is what the next 3 options are for. As we mentioned before there is a size property for each individual axis. In this example we increased the X size to 20, the Ysize to 15 and left the Z size at 10. As you press the plus button you should notice the outline for the grid getting larger on the screen.

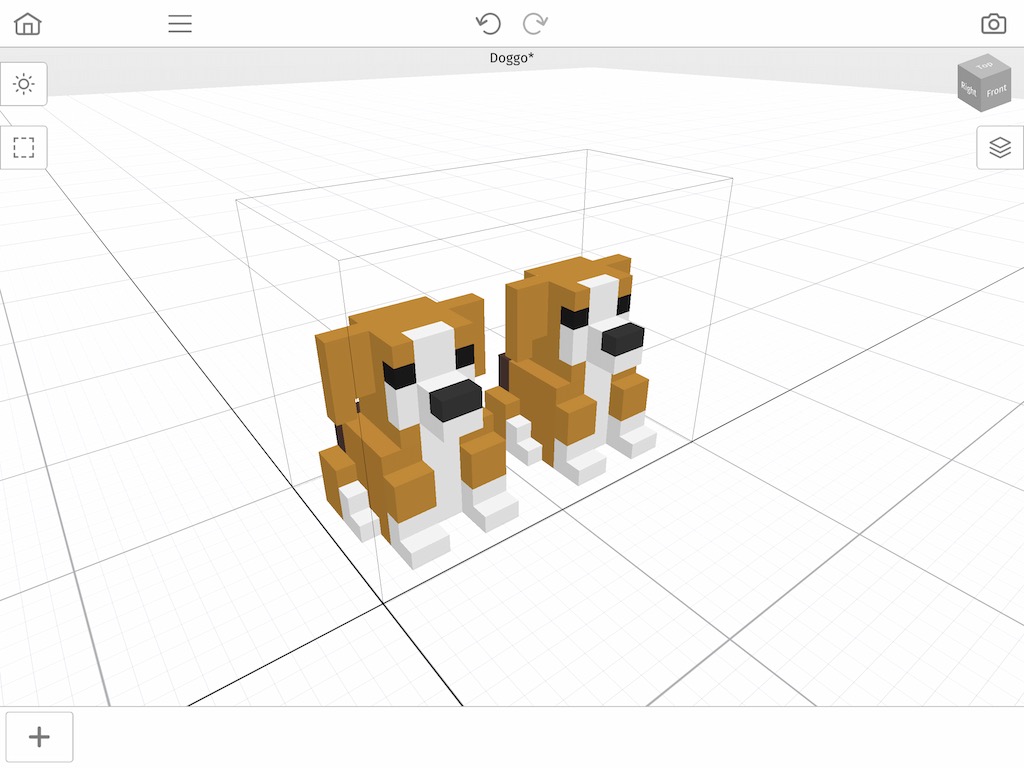
When you are finished, tap the Done button. Immediately you will be taken back to Model Mode inside of the editor. The outline on your grid should be noticeably larger, specifically on the X and Y axis like the image below.

Feel free to add voxels inside of your newly resized grid. As a test we duplicated the dog and added as second dog in the same grid to demonstrate how the grid became larger.

As you can see it is now possible to add more voxels, even entire models now that are grid is larger.
Wrap Up
Mastering this simple technique of Resizing the Grid in Mega Voxels is crucial to making larger models. If you have any questions please ask below. Also if you found this tutorial helpful, please consider sharing.
